Braided hairstyles are more than just a look—they’re art, culture, and creativity all rolled into one. For many with Black hair, braids are part of a cherished routine, connecting generations and offering beautiful, protective styles for any occasion. If you’re searching for quick, easy braided hairstyles for Black hair and want step-by-step help as a beginner, this friendly guide is for you. Let’s break down simple braiding basics, beginner-friendly tutorials, care tips, and answer all the most popular questions.
Why Braiding Is Perfect for Black Hair
Braiding isn’t just beautiful—it’s practical. Braided styles protect natural hair from damage, reduce daily styling time, and can last for weeks. Many styles are ideal for all ages, from little ones with tender scalps to adults looking for a change. My earliest hair memories are from “hair day,” sitting with my mom as she braided my hair into neat rows, sharing family stories and a few laughs. Even as an adult, braids mean community and confidence.
The Easiest Braid for Beginners: The Classic Three-Strand Braid
Why Start Here?
The foundation of most braided hairstyles is the classic three-strand braid—easy, quick, and versatile.
Step-by-Step:
-
Prep: Start with detangled, stretched hair. Use a leave-in conditioner or light oil for smoothness.
-
Section: Grab a chunk of hair where you want your braid. Divide it into three equal sections.
-
Cross: Take the right section over the middle—now it’s the new middle piece.
-
Repeat: Cross the left section over the new middle.
-
Continue: Keep alternating, right then left, pulling gently for even tension.
-
Secure: At the end, add a hair tie.
Practice is key! Your first braid may look wobbly, but keep trying—it gets easier and neater. I’ll never forget my niece’s pride after she finally braided her own hair for the first time!
Quick and Easy Braided Styles to Try
Let’s break down some beginner-friendly braid styles for Black hair, each with simple steps and care tips.
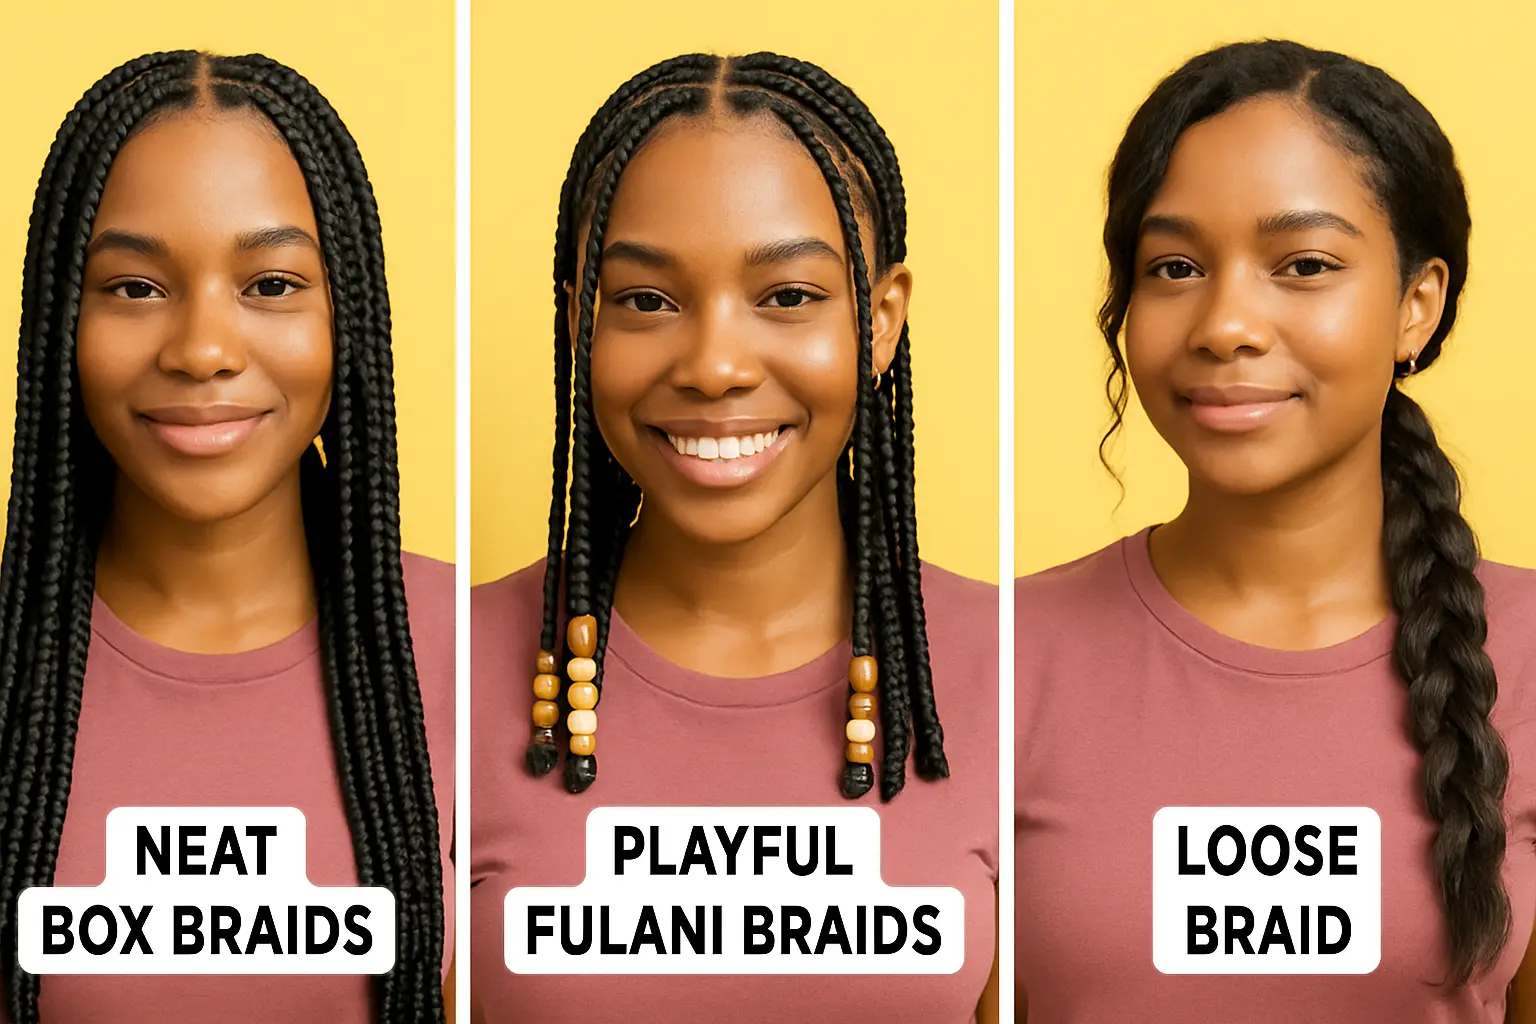
1. Box Braids
What They Are:
Sectioned square parts, each plaited into an individual braid. Great for length and thickness—use extensions if you want a fuller look.
How To:
-
Section hair into small squares.
-
Take each and split into three, braiding down to the tips.
-
Add hair extensions for longer, thicker braids if you like.
-
Secure ends with elastic or by dipping in hot water (for synthetic hair).
Pro Tip: Box braids can last weeks with proper care and regular scalp moisturizing.
2. French Braids
What They Are:
A neat three-strand braid begun at the scalp and built by adding more hair as you go. Works for thick or thin hair and stays secure.
How To:
-
Start with a section at the front of your head.
-
Divide into three strands.
-
Braid once, then start adding a small amount of loose hair to each outer section before crossing over the middle.
-
Continue until all hair is included, braid to the ends, and secure.
When I was in middle school, my mom taught me French braids on weekend mornings. The sense of accomplishment—and not having to redo my hair all day—was the best bonus!
3. Dutch Braids (Reverse Braids)
What They Are:
Like French braids, but the outer sections go under the center strand, making the braid sit above the hair. Also called “inside out” braids.
How To:
-
Start like a French braid but cross strands under rather than over.
-
Great for a bold, textured look.
-
Try pigtail Dutch braids for back-to-school or gym days.
4. Mohawk Braids
What They Are:
A bold, trendy style where the hair is cornrowed tight on the sides and braided into one or more rows down the center (like a fauxhawk).
How To:
-
Part hair into three sections: sides and center.
-
Cornrow sides up toward the middle (ask for help if new to cornrowing).
-
Create chunky Dutch or regular braids along the middle.
Best for making a statement at special events or just for fun!
5. Fulani Braids
What Are Fulani Braids?
Inspired by the Fulani people of West Africa, these braids are distinguished by a central cornrow, side braids that frame the face, adorned with beads, shells, or rings.
How To:
-
Start with a cornrow down the center of the scalp.
-
Add cornrows on the sides, letting two or more hang beside the face.
-
Decorate with beads or cuffs for a beautiful finish.
Many Black women, including celebrities, love Fulani braids for the heritage and the opportunity for creative hair jewelry.
6. Mermaid Braids
What Are Mermaid Braids?
This style uses curly or wavy hair extensions for a flowy, beachy effect—loose, chunky with a boho feel.
How To:
-
Create a loose Dutch or French braid, pulling on the sides to pancake and fluff it out.
-
Add curly synthetic hair to the braid for extra volume and length.
-
Leave some strands out, or “clip away” pieces, for added carefree waves.
Pro tip from my best friend who tried mermaid braids at a summer festival: Use lightweight wavy hair and avoid over-braiding to keep the look soft.
What Hairstyle Is Best for Black Hair?
There’s no single “best” style, but braids are at the top for flexibility, protection, and style. Box braids, cornrows, Marley twists, Senegalese twists, Fulani braids, and goddess locs are just a few favorites. The best style depends on your lifestyle, length, and the time you want to dedicate to maintenance. Start with beginner options, then branch out!
Hair Care Tips for Braided Styles
-
Moisturize! Use a spray leave-in or lightweight oil to keep both scalp and braids hydrated.
-
Wash gently. Use diluted shampoo and focus on the scalp; rinse thoroughly.
-
Protect at night. Wear a satin scarf or bonnet to reduce frizz and breakage.
-
Don’t keep braids in too long. 4-8 weeks is a safe range; longer can cause tangling and buildup.
How to Braid for Kids: Step-by-Step
-
Prep hair with a detangling spray and gentle brush—avoid tears!
-
Choose simple braids like pigtails or basic three-strand plaits.
-
Use colorful ties or beads to keep kids interested and happy.
-
If your child is squirmy, put on a favorite show or storytime for distraction.
My daughter loves “hair time” before school—a quick braid with a sparkly bead makes her feel like a princess all day!
Beginner’s Checklist: Braiding Essentials
-
Wide-tooth comb and edge brush
-
Rubber bands/hair ties
-
Edge control gel or beeswax
-
Lightweight hair oil or spray
-
Beads or decorative cuffs (optional)
-
Silk/satin scarf or bonnet for bedtime
Troubleshooting Common Braiding Challenges
Braids are too tight:
Loosen your grip. Tight braids can cause headaches and hair loss.
Strands slip out:
Practice grip and tension. Start with slightly damp hair for more control.
Hair frizzes after a day:
Smooth with edge control and tie with a silk scarf overnight.
Unique Insights: The Emotional Side of Braiding
Braiding is more than styling. It’s a cultural tradition passed down through generations. It’s family time, creativity, and even self-care. Learning to braid empowers both adults and kids—after my aunt showed me her first box braids as a teen, she wore them like a crown, and years later taught her own daughter with the same pride.
Quick Review: Your Step-By-Step Braid Plan
-
Pick your style: classic, box, Dutch, Fulani, mermaid, or Mohawk.
-
Prep hair: clean, detangle, moisturize.
-
Section: using clips or bands for a clean workspace.
-
Braid: start simple, don’t rush, use mirrors, or get help for the back.
-
Secure: use elastics, knots, or dip in hot water, depending on hair and braid type.
-
Accessorize: beads, cuffs, ribbons.
-
Maintain: oil scalp, wear a scarf at night, refresh as needed.
Final Encouragement
Braiding may seem tricky at first, but it gets easier with practice. Start with a basic style and move to more advanced braids as your confidence grows. Try different patterns, experiment with accessories, and always celebrate your beautiful Black hair! Remember, your crown is unique—so have fun, be patient, and braid with pride.